
Choosing the best Solar Lighting Poles requires more than comparing prices or panel sizes. A reliable decision begins with the site itself. Consider sunlight exposure, wind strength, soil conditions, pedestrian movement, and nighttime safety requirements. A pole beside a coastal walkway faces different challenges than one installed near a shaded parking area.
Experienced project teams examine the complete lighting system, not the pole alone. Check the solar panel efficiency, battery capacity, LED output, controller quality, and mounting structure. Ask how many hours the light can operate after several cloudy days. Review the pole’s corrosion protection, foundation design, cable routing, and maintenance access. Small details matter. A poorly sealed battery enclosure can shorten service life quickly.
Manufacturers should provide clear test data, installation guidance, warranty terms, and documented performance claims. Their products should align with recognized electrical, structural, and lighting standards. Independent certifications can improve confidence, but they do not replace site-specific assessment. In practice, a higher-priced model may deliver better value through stronger materials and fewer service visits. However, assumptions can fail. I have seen attractive specifications overlook winter shading, difficult soil, or vandal-resistant requirements. That is why a practical evaluation should compare total ownership costs, expected illumination, environmental risks, and replacement access. The best Solar Lighting Poles are not simply the brightest or cheapest. They are dependable, appropriately designed, and supported by evidence.
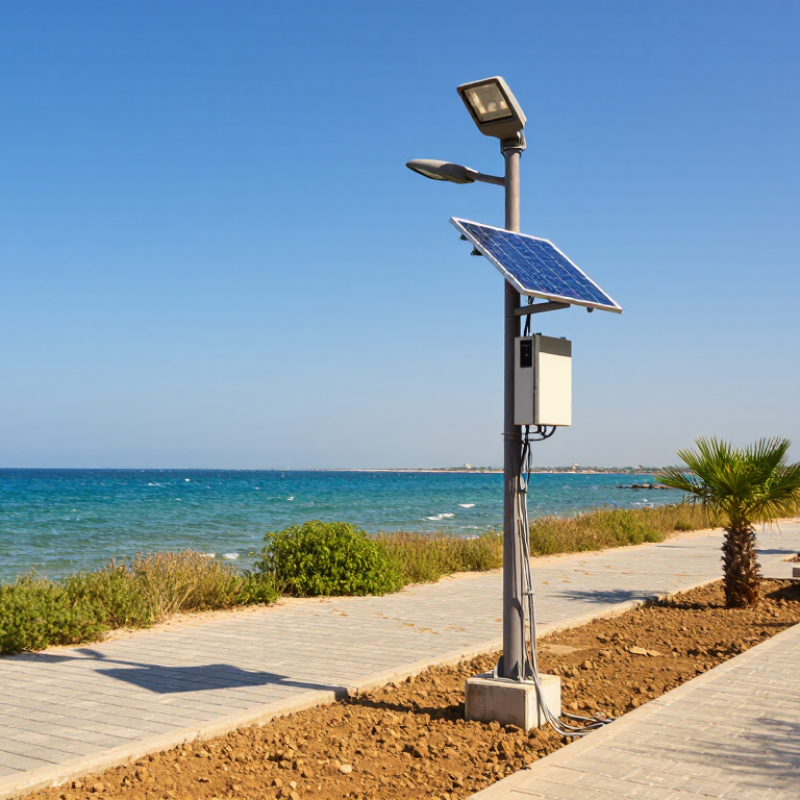
Solar lighting poles are outdoor structures that combine a photovoltaic panel, battery, controller, and LED fixture. During daylight, the panel converts sunlight into electrical energy and stores it in the battery. At night, the controller releases power to the LED light.
Simple in principle.
Performance depends on details.
Pole height, panel angle, battery capacity, and local weather all affect illumination.
When choosing a pole, begin with the site rather than appearance. A path under tree shade may need a larger panel or wider spacing. An open parking area usually receives stronger sunlight, but wind exposure can be higher. Check the required lighting level, operating hours, soil condition, and maintenance access.
In field inspections, weak batteries often caused early failures, not the LEDs. That finding is easy to overlook. No design is perfect.
Tips: Review seasonal sunlight data before selecting panel capacity. Choose corrosion-resistant materials for coastal or rainy locations. Confirm the battery can support several cloudy nights. Ask for tested lighting data, not only impressive photographs. Leave clear access for cleaning panels and replacing batteries. I once underestimated maintenance distance, which made a simple service task unnecessarily difficult. Small planning errors matter.
Choosing a solar lighting pole starts with the site, not the product catalogue. Measure walking paths, road widths, tree cover, and nearby buildings. A sunny showroom cannot represent a shaded courtyard. Check seasonal sunlight, especially during winter, when shorter days reduce charging time.
Assess the light output, battery capacity, and required operating hours together. A powerful lamp may drain its battery before dawn. Ask whether the system can provide several cloudy nights of service. Review the solar panel’s efficiency, battery chemistry, charging controls, and replacement access. These details affect reliability more than a high brightness figure. Confirm the lighting distribution, too. Narrow beams can leave dark gaps between poles.
Pole height and spacing should match the area’s purpose. Pedestrian paths often need softer, lower lighting than parking areas. Examine the pole’s corrosion resistance, foundation design, wind rating, and cable protection. Look for suitable weather protection and documented testing. Maintenance also matters. Can workers clean the panel safely? Can they replace the battery without removing the entire pole? A bright test after one sunny day proves very little. I would request performance data from comparable climates and inspect the installation plan carefully. Even careful estimates can fail when trees grow, dust builds up, or nearby lights create glare. Their effect is easy to underestimate.
Suggested assessment emphasis for comparing solar lighting pole systems
Prioritize lighting performance, local solar availability, and battery autonomy before comparing appearance or purchase price. Also verify weather protection, structural strength, installation conditions, maintenance access, and total cost of ownership. These percentages are a practical planning baseline and should be adjusted to the site, climate, lighting schedule, and applicable local standards.
How to Choose the Best Solar Lighting Poles?
Selecting the solar panel and battery system starts with the lighting load, not the pole height. Measure the lamp’s real wattage and operating hours. Include dimming schedules and cloudy-night requirements. Field conditions are often less tidy than design sheets.
Calculate daily energy demand in watt-hours. Then use this practical formula: battery capacity equals daily energy multiplied by autonomy days, divided by usable depth of discharge and system efficiency. For example, a 40-watt lamp operating 12 hours needs 480 watt-hours daily. A three-night reserve requires more than 1,440 watt-hours before losses. Do not size the battery by amp-hours alone. Voltage matters.
Use the World Bank’s Global Solar Atlas to check local solar irradiation and monthly PV output. Design around the weakest solar month, not the annual average. IRENA’s Renewable Capacity Statistics 2024 reports global solar capacity exceeded 1,400 GW by the end of 2023. Solar technology is proven, but local shading still defeats good equipment. Allow reasonable losses from heat, dust, wiring, and controller conversion. A conservative first estimate may use a 20–30% derating factor.
Choose panels certified for relevant IEC performance and safety standards. Match the battery chemistry to temperature, maintenance access, and expected cycle life. Cold weather reduces available capacity. Heat accelerates aging. That detail is easy to overlook. I would also request measured operating data after installation, because real performance may challenge the original assumptions.
Choosing the best solar lighting poles begins with the location, not the catalogue. A coastal walkway needs corrosion-resistant materials and stable foundations. A rural driveway may need fewer, taller poles. Measure the path, soil, tree cover, and winter sun exposure before selecting equipment.
Pole height controls both coverage and glare. Poles between four and six meters often suit pedestrian paths, but spacing matters more than height alone. Place lights near entrances, steps, and turning points. Avoid positioning them behind branches or walls. A brighter fixture is not automatically safer.
Light output should match the task. Warm light can feel comfortable near homes, while neutral white light may improve visibility in parking areas. Check delivered lumens, beam angle, and uniformity instead of relying on wattage. My first instinct was to choose maximum brightness. That was not always wise. Excessive light created glare and reduced visual comfort.
Useful features include dusk-to-dawn sensors, dimming schedules, replaceable batteries, and remote monitoring. Select batteries with enough reserve for several cloudy nights. Examine the solar panel angle and seasonal shading. Weather protection should match local rain, dust, and temperature conditions. Also inspect access for future cleaning and battery replacement. A beautiful pole that requires specialized maintenance can become an expensive mistake. When possible, test one unit after dark before installing the full row. Real shadows often reveal problems that daytime drawings miss.
| Location / Application | Recommended Pole Design | Typical Pole Height | Typical LED Output | Typical Spacing | Preferred Light Distribution | Useful Features |
|---|---|---|---|---|---|---|
| Pedestrian paths and cycleways | Straight tapered steel or aluminum pole with a compact, shielded luminaire | 3–5 m | 1,500–4,000 lm | 15–25 m | Type II or Type III, with low glare | Motion dimming, warm or neutral white light, vandal-resistant housing, shielded optics |
| Residential streets | Tapered galvanized steel pole with a short outreach arm or integrated solar head | 5–7 m | 3,000–8,000 lm | 20–35 m | Type II or Type III for road edges | Programmable dimming, dusk-to-dawn control, replaceable battery compartment, corrosion protection |
| Local and collector roads | Wind-rated tapered steel pole with a longer outreach arm and asymmetric roadway optics | 6–9 m | 6,000–15,000 lm | 25–40 m | Type II, Type III, or Type IV according to road width | High-efficiency LED module, adaptive dimming, remote monitoring, surge protection, certified wind loading |
| Parking areas | Octagonal or round tapered pole with a wide-area luminaire; use a twin-arm design for large lots | 6–10 m | 8,000–20,000 lm | 25–45 m | Type III or Type V for broad, uniform coverage | Occupancy sensors, camera-ready power provision, anti-corrosion coating, uniformity control |
| Parks and recreational spaces | Short decorative or straight pole with fully shielded, downward-facing optics | 3–6 m | 2,000–6,000 lm | 18–30 m | Type II or Type III with controlled spill light | Low-glare lens, 2,700–4,000 K color temperature, wildlife-sensitive programming, tamper-resistant fasteners |
| Security perimeters and remote facilities | Robust galvanized steel pole with a raised solar panel and independently serviceable battery | 5–8 m | 4,000–12,000 lm | 20–35 m | Type III or Type IV for perimeter coverage | PIR or microwave sensor, remote fault alerts, high battery autonomy, optional CCTV or emergency call integration |
| High-wind, coastal, or exposed sites | Engineered tapered steel pole with reinforced foundation, compact panel arrangement, and marine-grade protection | 4–8 m | 3,000–12,000 lm | 20–35 m | Narrow or asymmetric distribution to reduce wind-exposed surface area | Site-specific wind calculation, hot-dip galvanizing, powder coating, stainless fasteners, secure panel mounting |
| Design Factor | Practical Recommendation | Why It Matters |
|---|---|---|
| Nightly operating profile | Use a scheduled dimming profile, such as full output during peak hours followed by reduced output. | Lower overnight energy consumption can reduce panel and battery size while maintaining useful illumination. |
| Battery autonomy | Plan for approximately 2–5 nights of autonomy, depending on local weather, safety requirements, and maintenance access. | Additional autonomy improves reliability during consecutive cloudy or rainy days but increases system size and cost. |
| Battery technology | Lithium iron phosphate batteries are commonly selected for compact systems and frequent cycling; protect all batteries from excessive heat and cold. | Battery life depends on temperature, depth of discharge, charging control, and the number of operating cycles. |
| Solar resource | Size the photovoltaic panel using the site’s solar irradiation, seasonal conditions, shading, panel orientation, and system losses. | A panel that performs well in summer may not provide enough energy during the least sunny season. |
| Light quality | Select optics and color temperature based on pedestrian comfort, road safety, glare limits, and nearby homes or wildlife. | Higher lumen output alone does not guarantee good visibility; uniformity and glare control are equally important. |
| Structural design | Verify pole strength, foundation requirements, panel area, luminaire weight, and local wind-load criteria before installation. | Solar panels and fixtures add exposed surface area and can significantly affect wind loading. |
Note: The values shown are typical preliminary planning ranges. Final pole height, spacing, lumen output, battery capacity, photovoltaic capacity, foundation, and lighting uniformity should be confirmed through a site-specific photometric and structural design.
Choosing the best solar lighting poles requires more than comparing purchase prices. Installation conditions can change the real budget quickly. A site survey should check soil strength, drainage, shading, wind exposure, and access for delivery equipment. Poles with integrated batteries may install faster, but heavy units can require lifting machinery. Measure twice. A clear foundation plan reduces concrete waste and prevents costly repositioning.
Maintenance costs depend on battery access, panel angle, and component quality. Ask how technicians will reach the battery and controller after installation. A sealed compartment may resist rain, yet it can slow repairs. Panels near dusty roads may need seasonal cleaning, while shaded panels can reduce nighttime output. Review replacement intervals, service procedures, and spare-part availability. The lowest maintenance estimate is not always realistic.
Long-term cost comparisons should include energy savings, battery replacement, labor, transport, and disposal requirements. Calculate expected performance over at least ten years, using conservative sunlight data rather than ideal conditions. In practice, winter performance may disappoint if the battery has limited reserve capacity. I have seen project plans focus heavily on bright summer output. That approach needs reconsideration. A reliable comparison also checks warranty coverage, lighting hours, backup behavior, and local installation expertise. One overlooked access problem can cost more than the pole itself.
Solar lighting poles combine a photovoltaic panel, battery, controller, and LED fixture. The panel stores sunlight during the day. The battery powers the light at night. Simple in principle. Weather and design details affect performance.
Inspect the site before considering appearance. Check tree shade, soil, path width, winter sunlight, and maintenance access. Open areas usually receive more sunlight. They may also face stronger winds.
Poles between four and six meters often suit pedestrian paths. Height alone does not determine coverage. Spacing, beam angle, and nearby walls also matter. Place lights near entrances, steps, and turning points.
Match light output to the activity. Warm light may feel comfortable near homes. Neutral white light can improve visibility in parking areas. Check delivered lumens, beam angle, and uniformity. Maximum brightness is not always safer.
Select a battery with reserve capacity for several cloudy nights. Review seasonal sunlight data before choosing panel capacity. Tree shade may require a larger panel or wider spacing. Results can vary during long, dark periods.
Dusk-to-dawn sensors automate nighttime operation. Dimming schedules can reduce unnecessary brightness. Replaceable batteries simplify future service. Remote monitoring may help identify faults. Useful, but not essential everywhere.
Coastal and rainy locations need corrosion-resistant materials. Weather protection should match local rain, dust, and temperature conditions. Foundations must suit the soil. Wind exposure deserves attention, especially in open parking areas.
Leave clear access for panel cleaning and battery replacement. Weak batteries often cause early failures. Test one unit after dark before installing the full row. Real shadows can expose problems that drawings miss. I once underestimated maintenance distance. That mistake made a simple repair unnecessarily difficult.
Choosing the best Solar Lighting Poles requires more than comparing appearance or price. These systems combine solar panels, batteries, LED fixtures, controllers, and support poles to collect sunlight during the day and provide reliable lighting at night. Before selecting a model, assess the location’s sunlight exposure, climate, installation area, required illumination, and expected operating hours. These factors will help determine the appropriate solar panel capacity, battery type, storage size, and charging performance.
The pole’s height, material, design, and resistance to wind or weather should match the site’s conditions and visual requirements. Consider light output, beam angle, color temperature, motion sensors, timers, and smart control options to achieve efficient and comfortable illumination. Finally, compare foundation work, wiring needs, installation difficulty, routine cleaning, battery replacement, warranty coverage, and expected service life. A slightly higher initial investment may provide better reliability and lower maintenance and energy costs over the long term.
